
| Archive Blog Cast Forum RSS Books! Poll Results About Search Fan Art Podcast More Stuff Random |
|
Classic comic reruns every day
|
1 {photo of a man taking a photo with a medium format camera on a tripod}
1 Caption: Photographic Exposure
|
First (1) | Previous (3211) | Next (3213) || Latest Rerun (2895) |
Latest New (5380) First 5 | Previous 5 | Next 5 | Latest 5 Annotations theme: First | Previous | Next | Latest || First 5 | Previous 5 | Next 5 | Latest 5 This strip's permanent URL: http://www.irregularwebcomic.net/3212.html
Annotations off: turn on
Annotations on: turn off
|
Photography is all about capturing light and recording it, so that you can look at it later. Or at least at a reasonable facsimile of the original light.
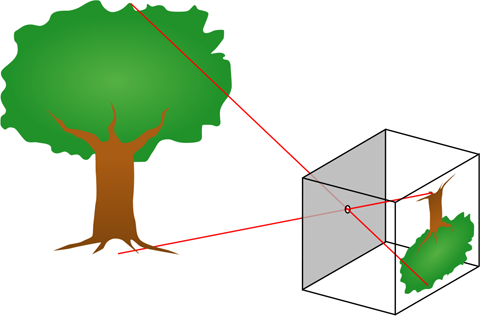
 Pinhole camera diagram. Public domain image, by Bob Mellish and Pbroks13, from Wikimedia Commons. |
If you take an enclosed box or room and poke a tiny pinhole in one side of it, you create a simple light projector. Rays of light coming from different parts of the scene pass through the hole and hit the opposite wall of the box in precisely the same spatial arrangement as they have in the scene, only upside down and perhaps at a different size. This is because each ray of light from one spot in the scene is constrained by the pinhole to hit only one small spot on the opposite wall. A viewer inside the room can then see an image of the scene outside on the wall opposite the pinhole.
You can see this for yourself. Many science museums have such a room. Or you can fairly easily create one yourself, by blocking all sources of light from entering a room, except for a pinhole in one wall. You can do this by completely covering any windows with aluminium foil, and poking a single hole in it with a pin. You'll also need to block light seeping under doors, or coming out of power indicators on any appliances, to get it completely dark (except for the pinhole). Once your eyes have adjusted to the dimness, you'll be able to see the outside world projected, upside down, on the wall opposite the pinhole. Such a room is called a camera obscura, from the Latin words camera, meaning "room"[1], and obscura, meaning "dark". From this origin, we get our modern English word "camera".
You can use a camera obscura arrangement to take actual photos. If you take the camera body cap of a modern SLR camera (film or digital) and make a tiny hole in it, you can use that instead of a lens. Light from the scene simply enters through the pinhole, hits the image sensor at the back of the camera, and makes an image. And because the camera is already designed with an inverted image in mind, your view through the viewfinder and the image produced when you click the shutter, are the right way up. You can make such a pinhole for your SLR fairly easily yourself: there are plenty of tutorials on the web. If you're not crafty and don't mind spending a bit of money, you can even buy professionally made ones.
 Photo taken with a DSLR and a pinhole I made myself. |
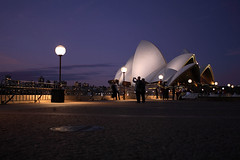
 A slow shutter speed lets you capture photos in dim light. |
Shutter speed is measured quite simply, in seconds. Typical shutter speeds are small fractions of a second: 1/60, or 1/100, or 1/500 of a second for example. Usually the numbers written on a camera shutter speed dial, or displayed on a modern camera's LCD display, omit the "1/" part and simply display 60, or 100, or 500. You should remember that a shutter speed of "200" usually means 1/200 of a second.
Aperture value, by contrast, is measured in what may seem at first to be an arcane and incomprehensible manner. Typical aperture values might be listed as f/1.4, f/4.5, or f/16. These numbers are called f-numbers. But what do they mean? Well, the f stands for another important variable in photography: the focal length of the camera lens. Oh wait, I haven't even mentioned lenses yet!
Why do cameras have lenses, instead of just pinholes like a camera obscura? The answer is that pinholes don't let in enough light to be useful in many photographic situations. To get enough light, you need to make the hole bigger. The problem then is that the image formed on the camera sensor is blurry, because the rays of light coming from any one point in the scene are not constrained by the pinhole to only hit one point on the sensor. They can spread out and blur together with light rays coming from different parts of the scene. To solve this problem without making the hole smaller again, we can use a lens to bend the light rays. If designed properly, the lens will bend all of the light rays coming from one point in the scene so that they hit the same point on the sensor, no matter where they pass through the lens.
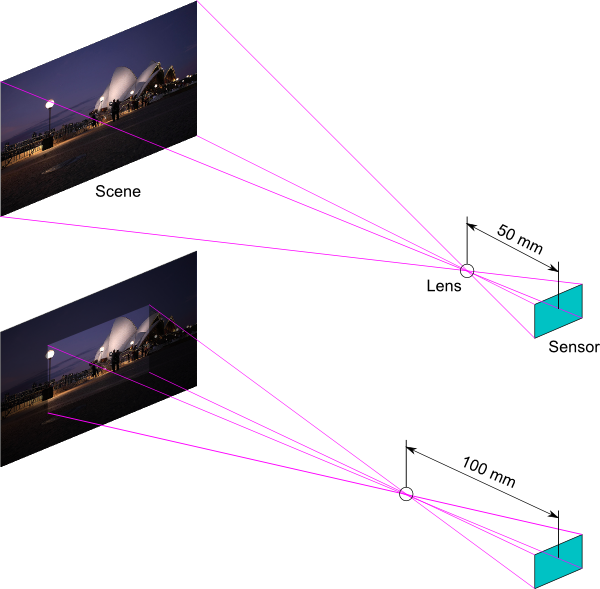
 Focal length and field of view. Doubling the focal length gives you a field of view half as wide and half as high. |
Why do we want different focal lengths? It's a matter of composing your photograph. If you want a wide, sweeping landscape, you need a short focal length (also known as a wide-angle lens). If you want to "zoom in" on something a long distance away, you need a long (or telephoto) focal length. And for mid-range things like photos of your friends you want a middling focal length. If you look at the diagram on the right, you'll see that the closer the pinhole to the sensor, the wider your field of view, and the further away, the more zoomed in is your field of view. So photographers like to have a variety of focal length options.
There is a small complication with measuring the focal length of a lens. Modern camera lenses are nothing like simple pinholes, nor even simple lenses made of a single bit of glass. They are complicated tubes containing a dozen or more separate chunks of glass, arranged in precise alignment. The paths of light rays through a modern lens are complex, as they are bent multiple times by the different pieces of glass. However, to a first approximation, you can still consider them to be equivalent to a pinhole, placed at a specific distance from the camera sensor. That is, you can treat the light paths as they are outside the complex inner workings of the lens as though they are simply passing through a pinhole located somewhere inside the lens.
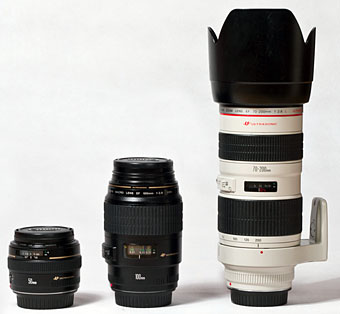
For most lenses, the equivalent pinhole is indeed somewhere inside the lens. This is why a 50 mm lens is shorter than a 100 mm lens, which is in turn shorter than a 200 mm lens. You'll notice that lenses like this are roughly the same length as their focal length. To get a longer focal length, you need a longer lens. This falls down, however, with really short focal lengths, like 24 mm or shorter. The simple fact is that 24 mm from the sensor is inside the camera in an SLR. Lenses are designed to attach to the front of the camera, not sit inside it. So the lens designers need to use some optical trickery to produce a lens that bends the light to match the way a pinhole would work if it was behind the lens, inside the camera.
Anyway, that's focal length. Back to aperture value. Those weird f-number values like f/4.5 specify the diameter of the (circular) aperture as a fraction of the focal length of the lens. The f actually stands for focal length, and the / is actually a division symbol! So the diameter of the aperture of a 100 mm lens at aperture value f/4.5 is 100/4.5 = 22.2 mm. The aperture values of lenses can be changed by an iris-like diaphragm, which is mechanically moved into place when you take your photo. The same lens might also be able to work at apertures ranging from aperture value f/2.8 = 35.7 mm diameter, down to f/22 = 4.5 mm diameter. Notice that the bigger the f-number (22), the smaller the diameter of the aperture (4.5 mm).
 Aperture diaphragm in a Jupiter 11A 135 mm lens. Creative Commons Attribution image by Bart Kuik, from Flickr. |
So to get the same exposure on your photo, you can select any combination of shutter speed and aperture value listed in the following table. I've also listed the actual aperture diameter, if you were using a 100 mm lens.
| Shutter speed | Aperture value | Aperture diameter |
|---|---|---|
| 1/50 sec | f/8 | 12.5 mm |
| 1/100 sec | f/5.6 | 17.9 mm |
| 1/200 sec | f/4 | 25.0 mm |
| 1/400 sec | f/2.8 | 35.7 mm |
| 1/800 sec | f/2 | 50.0 mm |
| 1/1600 sec | f/1.4 | 71.4 mm |
Now imagine you change the 100 mm lens to a 50 mm lens. A 50 mm lens has a field of view twice as wide as a 100 mm lens. So all the light from an area twice as wide and twice as high as the area seen by the 100 mm lens hits the sensor when using the 50 mm lens. In other words, the 50 mm lens captures 4 times the light of the 100 mm lens! The way to fix this is to adjust the aperture. To cut the light down by a factor of 4, we want to make the area of the aperture at 50 mm a quarter the size it was when we used the 100 mm lens. If we are using the first line of the table, with 1/50 of a second shutter speed and a 12.5 mm aperture diameter, then we want to cut the aperture diameter in half to 6.25 mm, in order to make the area four times as small. So, to get the same exposure with our 50 mm lens, we need to use an aperture half the diameter of the aperture we used with the 100 mm lens. So let's extend our table:
 Lenses of different focal length: 50 mm, 100 mm, and 70-200 mm zoom. Adapted from Creative Commons Attribution image by Christian Holmér, from Flickr. |
| 100 mm lens | 50 mm lens | |||
|---|---|---|---|---|
| Shutter speed | Aperture value | Aperture diameter | Aperture diameter | Aperture value |
| 1/50 sec | f/8 | 12.5 mm | 6.25 mm | f/8 |
| 1/100 sec | f/5.6 | 17.9 mm | 8.93 mm | f/5.6 |
| 1/200 sec | f/4 | 25.0 mm | 12.5 mm | f/4 |
| 1/400 sec | f/2.8 | 35.7 mm | 17.9 mm | f/2.8 |
| 1/800 sec | f/2 | 50.0 mm | 25.0 mm | f/2 |
| 1/1600 sec | f/1.4 | 71.4 mm | 35.7 mm | f/1.4 |
All of the lines in the table produce the exact same exposure of your photo. Notice that if you use a 50 mm lens, the aperture diameters are different to what you'd need to use with a 100 mm lens, but the aperture values are exactly the same!
This is why aperture value is described in terms of the focal length of the lens. It lets you completely ignore the focal length of the lens when working out your exposure. That makes the process of photography easier. Given a scene, you can measure how much light there is (usually using a light meter, or you can even estimate it by eye with experience). Then pick a shutter speed and your aperture value is determined for you; or conversely pick an aperture value and you (or your camera) can work out what shutter speed to use. You don't need to know what lens you are using. If apertures were specified in terms of the aperture diameter, you'd need to know the focal length of your lens before you could figure out the correct exposure.
Changing the amount of light you capture is only one of the effects that aperture value, shutter speed, ISO speed, and focal length have on your final photo. You'll notice from the above table that a shutter speed of 1/100 of a second at f/5.6 with a 50 mm lens gives you the same exposure as a shutter speed of 1/100 of a second at f/5.6 with a 100 mm lens, and also the same exposure as a shutter speed of 1/800 of a second at f/2 with either lens. And if you change the ISO speed you can change both the shutter speed and aperture value in various other combinations, again to get the exact same exposure. For any given exposure, there are dozens of combinations of aperture value, shutter speed, and ISO speed that will give the same exposure. And you can achieve it with a lens of any focal length you care to choose.
Why so much choice? Aha! Now we start getting away from the technique of capturing light into the art of taking a good photo. And that's a large discussion in itself, for another time.
[2] At least, the most important technical thing. You could argue that the artistic composition of the photo is more important than the technical execution. In some cases I'd probably agree. But I'm really talking about technical stuff today, not artistic stuff.
[3] ISO in fact refers to the International Organisation for Standardisation, which issues standards for measurements and other things. ISO film speed is merely the system of measuring film speed approved by ISO. So abbreviating "ISO speed" to "ISO" rather than to "speed" is a bit weird, but it seems that everybody does it.
|
LEGO® is a registered trademark of the LEGO Group of companies,
which does not sponsor, authorise, or endorse this site. This material is presented in accordance with the LEGO® Fair Play Guidelines. |